|
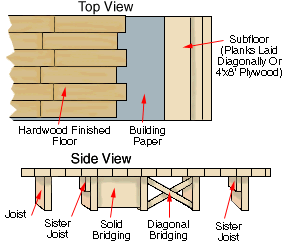
Anatomy of a Floor
How to Lay a Floating Wood Floor
Floating floors are special tongue-and-groove boards that lie on thin sheets of foam or cork underlayment. They are glued only at their edges and ends.
Keep in mind that wood is organic, so expansion and contraction will occur depending on the level of moisture in the air. Before you install your new wood floor, allow the boards to sit inside your home for at least three days to acclimate to the conditions.
Preparing the Floor
-
Cut up the old floor in manageable pieces and remove it by peeling back with a long-handled scraper.
-
Remove all pieces of the old flooring and vacuum thoroughly.
-
Fill in the low spots. You can check for low spots by placing a floorboard on the floor on its edge.
-
Unroll the underlayment, starting along a wall. Cut it to fit with a utility knife.
-
Mark guidelines on the underlayment for proper alignment of your floorboards.
Installing Flooring in Doorways
-
Using a panel saw, cut the door moulding at the bottom so the new floor will fit underneath. Use a piece of flooring to judge the size cut you need to make.
-
Remove the cut moulding with a utility knife. Slide the new flooring underneath the notched door moulding up against the wall.
Laying the Floorboards
-
Fit the first board into a corner. Use a wood spacer to leave an expansion gap between the flooring and the wall.
-
Slide a second floorboard into the end of the first one. The tongue-and-groove should fit.
-
Firmly press the boards together and insert a spacer near the joint.
-
Before installing the next board, apply adhesive to the edges, but do not get the glue in the actual groove. Some floors require adhesive on the ends as well as the edges. Check with the manufacturer.
Tip: Use an aliphatic resin glue. It is white and dries in about an hour, completely curing in 24 hours. Wipe any excess or spills with a damp sponge.
-
Position the board and press into place. Secure it by tapping with a hammer. Use a scrap piece of wood between the hammer and the new flooring to protect it.
-
Proceed with the next boards until the last one. You might need to ripsaw the last row so it will fit.
-
Using a pry bar (and a piece of scrap wood to protect the wall), slowly lower and ease the last board into place.
How to Lay a Parquet Floor
Most parquet floors are made from hardwoods such as oak, cherry, mahogany, beech and pecan. For best results, make a dry run of the pattern you want to lay out by laying a test arrangement before permanent installation.
Even experts make mistakes when installing parquet flooring, so buy about 5 percent more flooring than you calculate that you will need for the project. If you do not need the extra material right away, it will come in handy later in case damage occurs.
Some rooms are not perfectly straight or square. When you begin laying your parquet floor, start at the center of the room and work outwards toward the walls. This establishes a well-aligned pattern throughout most of the room. If the room is irregular, only the edges of the finished floor will be ¡ª that is the area where it will be least noticeable.
|
Click a text link below to shop for that item.
Click the information icon  for a product buying guide. for a product buying guide. |
| Tools and Materials |
|
|
- Asphalt building paper (for concrete subfloor)
or plywood underlayment
- Parquet tiles
- Mastic adhesive
- Mastic solvent
- Scrap plywood
|
Preparing to Lay the Tiles
-
After removing the toestrips from the wall, inspect the subfloor. If it is not in good condition, replace it. The parquet floor will not turn out right if the subfloor is not in tip-top condition.
-
Find the center of the room by measuring from wall to wall.
-
Snap a chalk line between the center of opposite walls. Snap another chalk line between the other two walls, intersecting the first chalk line. This is your center point.
-
Using a carpenter's square, make sure the two intersecting lines form right angles.
-
Lay a test run of parquet along the chalk lines starting at the center, working toward the wall. Make sure they look straight, but do not glue them in place yet.
-
Adjust the center to keep the tiles on the edges of the room from being cut too thin.
-
At the intersection of the chalk lines, spread mastic on a 2' x 2' area and let it dry.
Laying the Tiles
-
Lay down a tile on the mastic using the lines for placement. Press in place firmly.
-
Tap the tile into place by putting a piece of scrap wood on top of it and striking the scrap wood with a mallet. Do not let the tile slip out of place when securing it.
-
Fill in one quadrant of the floor working toward each wall.
-
After tapping the tiles to secure them, clean up any mastic that seeps between the tiles using a cloth moistened with a solvent recommended by the manufacturer.
-
The last tiles against the walls will need to be cut to fit. Do this with a jigsaw. Cut them slightly smaller than the measurement indicates. This will allow for the effects of heat and humidity.
-
Let the mastic dry for at least a day. (Check with the manufacturer for any special instructions.) Then replace the toestrips.
How to Repair a Wood Floor
As sturdy as wood floors are, they still sometimes squeak, sag, or become damaged. Humidity and heat cause the boards to swell and shrink. This, in turn, makes the boards rub against nails or each other, hence, the squeaks.
To replace damaged boards, take an old one with you to match the color and grain. Winter is the best time to repair wood floors because the boards are not swollen. Replacement boards should not fit very tightly, because when warmer weather comes, they may swell and pop out of place.
If the floor is sagging, do not expect to fix it overnight. It took a long time for the sag to occur and if you try to hastily correct the problem, you could cause structural damage to your home.
|
Click a text link below to shop for that item.
Click the information icon for a product buying guide. |
| Tools |
Materials |
|
|
- Ring-shank flooring nails
- Wood putty or wood filler stick
- Screws
- Wood glue
- Wood plugs
- Spray silicone
- Powdered graphite or talc
- Triangular glazier's points
- Wood shims
- Concrete
- String
- 2x4s; 4x6 beam; wood block
|
Silencing Squeaks From Above
-
Mark the location of the joists on the flooring if you can.
-
Drill pilot holes at 45 degree angles toward each other at the joists to prevent the wood from splitting.
-
Drive 8d ring-shank flooring nails into the holes you made. Countersink the nails with a nail set and fill with wood putty.
Floorboards That Rub
Use a screwdriver to press triangular glazier's points coated with powdered graphite or talc between the floor boards where they join. Set them below the surface.
Silencing Squeaks From Below
-
Wedge a wood shim between the joist and subfloor. To secure it, drive a small nail through the shim into the subfloor.
Tip: When using a shim between the joist and subfloor, do not force the subfloor boards upward because you could cause the finished floor above it to separate.
-
A squeak could be caused by a sagging or twisted joist. The resulting gap can be fixed by wedging a 2x4 longer than the gap area into place with a temporary brace. With the brace holding the 2x4 in place, nail the 2x4 into the joist.
-
Check for loose nails. Remove them and replace with longer ones.
-
For squeaks between two joists, nail solid bridging to the joists. Be sure to end-nail the bridging as well.
Securing Warped or Curled Floorboards
- Mark the location of the joist on the finish floor and drill pilot holes through it. Counterbore holes about 1/3 the depth of your finish floor.
- Drive a screw and washer through the finish floor into the subflooring. This will pull the two floor layers together.
- Put some wood glue on a 1/2" wood plug and hammer it into place on top of the screw.
- Sand it down level with the finish floor and stain to match.
Replacing Damaged Boards
-
Use a circular saw to cut 3/4" deep down the middle of the entire length of the damaged board. Do not cut the adjacent boards.
-
Remove the damaged two halves with a pry bar. Remove the nails.
-
Measure and cut another board to replace the damaged one. Be very careful when cutting the ends. They need to be perfectly square.
-
The replacement board will have a groove on the side. Take off the bottom flange of this groove with a hammer and chisel, or circular saw. Be very careful if you are using the saw.
-
Put some glue on the edges of the new board, the edges of the flooring it will rest against, and the subfloor.
-
Put the replacement board in place and secure it by hammering it down. Use a scrap piece of wood between the floor and the hammer to protect the finish.
-
Stain the new board to match the old. Secure it with 8d flooring nails. Drill pilot holes first so the floor will not split, then set the nail heads.
-
Fill the holes with wood putty.
|
|
