|
SwiftLock Floor Systems
Unlike traditional wood floors, SwiftLock laminate floors are installed as "floating floors" that are not physically attached to the subfloor by nails, screws or pegs.
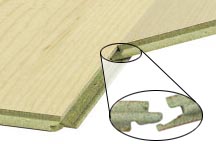 |
| SwiftLock floorboards attach without glue. |
The floorboards simply lock together. Expansion areas (concealed by wall base trim) are left along the perimeters of the finished floor, allowing the flooring to expand and contract with temperature and humidity changes.
Where to Install
SwiftLock laminate flooring is appropriate for any room and can be installed over ceramic tile, concrete, well-bonded vinyl or board/ply underlayments. It can even be installed over short pile carpet that is less than 1/4" high and has no pad underneath.
SwiftLock can be installed in the bathroom if you take certain precautions. For bathroom installation, apply a thin bead of laminate floor glue along the top of the tongue and a bead of silicone caulk in the expansion gap around the perimeter of the floor.
Prepare the Subfloor
Now that you have decided on where you want your SwiftLock laminate flooring, you must prepare the subfloor:
- Remove any existing wall base or trim.
- Assure that the subfloor is clean, dry, and level before proceeding.
- Roll out foam underlayment, which will provide soundproofing and make the floor more comfortable for walking. Do not overlap at the edges. Cut to fit the room, and install according to the manufacturer¡¯s instructions.
- If the flooring will not slide under the door casing, mark the casing 1/16" above the flooring. Cut the door casing at the mark with a coping saw or back saw.
- Check to see if the doors clear the new flooring. If a door does not clear the new flooring, mark it 1/8" above the floor. Take the door down and plane or cut it to the mark.
-
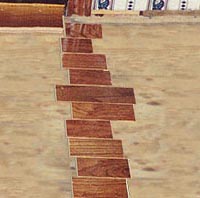 |
| Tightly butt small pieces of flooring together across the room. | Butt a piece of flooring against the wall, where you intend to start laying the floor. Tightly butt small pieces of flooring together across the room. In most cases, there will be a space between the wall and the last piece of flooring. Subtract twice the expansion gap from the space and add that number to the width of the flooring. Divide the sum in half to determine the width you need to cut the first row of flooring.
Example:
The expansion gap is 1/4", the space between the last board and the wall is 3", and the flooring is 4" wide.
2 x 1/4"= 1/2"
3" - 1/2"= 2 1/2"
2 1/2" 4"= 6 1/2"
6 1/2" / 2 = 3 1/4"
Rip-saw the first row of flooring to 3 1/4". Use this technique to avoid having a narrow strip of flooring in the last row. When using a power saw to cut the flooring, turn it finished side down. When using a hand saw to cut the flooring, turn it finished side up.
- Establish a baseline to make up for slight imperfections in the room. Mark the center of each wall, and snap chalk lines between the opposing marks. The point where the lines intersect is the center of the room. The line running parallel to the flooring is the base line.
- Measure from the center point to the wall where you intend to start the flooring. Subtract the expansion gap from this distance.
 Example: Example:
The distance from the center point to the wall is 106 1/2", and the expansion gap is 1/4".
106 1/2 - 1/4"= 106 1/4"
Measure from each end of the base line toward the wall 106 1/4," and snap a chalk line between the marks. The new line is the guideline.
Install the Flooring
- Inspect each piece of flooring prior to installation. Remove any damaged pieces.
- Cut the tongue off of the first row of flooring.
- Starting along one wall, lay out the first row of flooring with the tongue side against the guideline.
- Install 1/4" spacers between the flooring strip and the wall. The spacers establish the expansion area to allow for floor movement. This gap will be covered later with wall base moulding.
If the starting wall is crooked, scribe the contour of the wall on the flooring. Cut along this line to produce a board that conforms to the wall contour.
- Working from left to right, begin to lay the flooring pieces. Slide each piece to the left and lock the short end into place. Carefully tap the short ends of the boards to connect them.
- When you reach the wall, cut the last piece long enough to fit while maintaining a 1/4" expansion area at each side wall. As the floor is installed, maintain the 1/4" expansion area around the entire perimeter of the floor.
If you are using a hand saw, cut the flooring with the finish side up. If you are using a power saw, cut the flooring with the finish side down. This technique should minimize the possibility of damaging the finish during the cut.
- Put the last piece in place with a prybar, with 1/4" spacers at each end of the row.
 If the piece left is over 12" long, it may be used to begin the next row of flooring. If it is less than 12" long, cut a full board in half and use it to start the next row. Always keep a minimum of 12" of overlap between the end joints in adjoining rows of boards. Use the prybar to tighten up joints. If the piece left is over 12" long, it may be used to begin the next row of flooring. If it is less than 12" long, cut a full board in half and use it to start the next row. Always keep a minimum of 12" of overlap between the end joints in adjoining rows of boards. Use the prybar to tighten up joints.
- Continue laying boards one row at a time, locking them in to place as you go.
- Use spacers to maintain your 1/4" expansion space along the walls.
Apply the Finishing Touches
- Use transition mouldings as necessary. End mouldings, T-mouldings and reducer strips are available to make decorative and functional transitions where the new flooring meets existing flooring. (Pre-drill all mouldings and transition strips before nailing or screwing.)
- Install base mouldings along the wall perimeter to hide the expansion area and provide a decorative, finished appearance.
- Do not fasten flooring to the subfloor. Secure trim moulding to the wall or directly to the subfloor. Never nail through the flooring.
|
|
